How to Build Your Own Self-Watering Garden: Sub-Irrigation 101
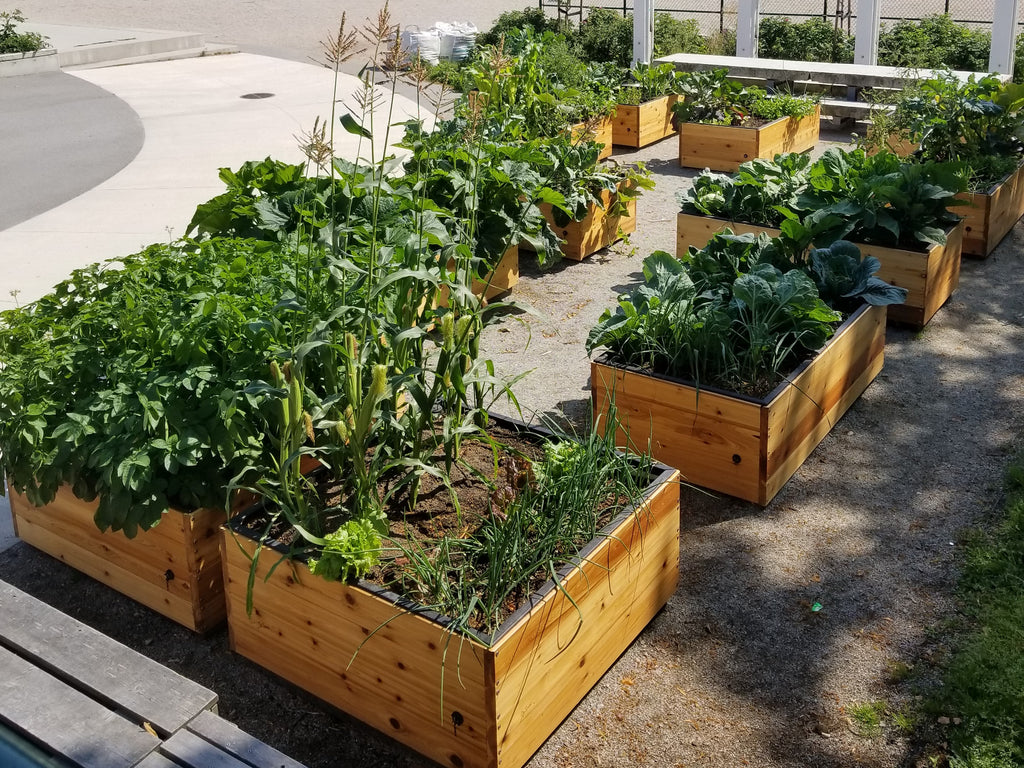
Self-Watering Gardens are an amazing way to grow your own food. By mimicking nature, they help you save water and save time, while creating the perfect growing environment for you plants to thrive.
This article covers the fundamentals of how to build your own self-watering sub-irrigated wicking bed, so that you can utilize this amazing biophilic technique. Whether you are truly DIY, or are thinking ahead to use one of our ready to install SIP.tech kits - by the end of this article you'll have the confidence to get growing!

Full disclosure - We developed SIP.tech to make building self-watering gardens easy and strait forward for everyone from DIYers to garden professionals. Our SIP kits come with everything you need to build long lasting professional grade self-watering gardens. This article will be valuable to anyone that it interested in sub-irrigation, but is framed specifically with SIP.tech in mind.

Overview


Step 1: Preparing the Location
Key Take Away: Make it Level and free from obstructions.
*If leveling the site itself is difficult, framing in a bottom to your garden is an excellent option, this allows you far more flexibility in leveling, by either elevating your garden on legs, or building foundational frames that can be scribed to site.

Sub-irrigation relies upon the reservoir at the bottom of your garden. Water naturally self-levels, so make sure your reservoir is level! If it is not, either your reservoir will not fill evenly, or the water from the reservoir will flood up into the soil, drown the roots and create anaerobic rot - not good!
- If not framing in the bottom of your garden, leveling the site can be done by digging down or building up.
- During this process consider what your garden will be resting on. Ensure that whatever surface you choose, it’s free from obstructions or anything that could puncture the liner.
- For placing reservoir liner directly on grade, ideal surfaces are:
- Pavers
- Decks
- Concrete/Patios
- Rounded river rock or pea gravel
- Outdoor tile
- Compressed earth, wood chips and grass are okay.
- Crushed rock and gravel with sharp edges is to be avoided.
Step 2: Build the Box
Key Take Away: Build a garden with an interior free from obstructions. Put any structural framing on the outside - make it easy to fold in your liner and install the SIPs

SIP.tech is designed for building gardens to the full foot. Each SIP is 12"x12" and clips together to for a grid any size. They can be trimmed with a saw if necessary, but building the garden suit tends to be easier.
When your building the raised bed. Use a design that has all the structure on the outside. This will make folding in the waterprooft liner much easier.
- Ideal interior box height acounts for 3" of water reservoir, and an additional 8-12" of soil depth for growing veggies and maximizing the wicking action (or capiliarry draw.)
Step 3: Drilling the Hole for the OverFlow Valve
Key Take Away: Center the overflow hole at 3" from the bottom of INSIDE your garden. Correlate the overflow hole with the top of the SIPs.

The overflow valve is very important. It ensures your garden never floods, and allows you to control the drainage to wherever you want it to flow. It also sets the maximum height/capacity of your reservoir, and allows aeration between water and soil.
- Be conscious of where you drill the Overflow hole as this is where ALL of the excess water will be directed.
Step 4: Installing the Liner
Key Take Away: DO NOT puncture the liner! Make sure all liner folds are folded UP to the top of the garden.

It should go without saying: DO NOT PUNCTURE THE LINER. It’s very tough, but be aware… a leaking liner defeats the entire purpose. The only hole that should be in your liner is the OverFlow hole.
- Place your pre-folded liner into your garden.
- Make sure it’s tucked nicely into the corners. Over time, water pressure will push it into the corners anyway.
- Begin by folding the flaps UP.
- All folds should end up at the top of the garden… think about how water travels and make sure you’re creating a sealed unit.
- Dry fit your liner so that you’ve got a nice tight fit.
- The next step is stapling, so do any adjustments now.
- Staple the liner into place along the top of your garden.
- Try not to go below 1” from the top of your garden. If you’re going for a nice professional finish, consider the aesthetics of the staple pattern, or like we do, plan for a trim piece and cap for a nice clean finish.
- Trim excess liner.
- Once the top of the liner is stapled, take an exacto knife and trim off any excess liner.
Step 5: Installing the OverFlow

- Find the hole you drilled in the box for your OverFlow.
- Use your finger and press around on the inside of your garden to find the pre-drilled hole.
- Use your utility knife to cut a small X in the center.
- You want the X just a bit smaller than the size of the hole. Consider the size of the rubber washer and be careful not to cut an "X" larger than the gasket can cover.

- Insert OverFlow valve.
- Ensure that it is fastened snugly, and the rubber gasket is compressed to form a water tight seal.
- Your OverFlow is now installed!
- You can leave it as is, install a drip chain, or connect a hose to direct water outflow wherever you like.
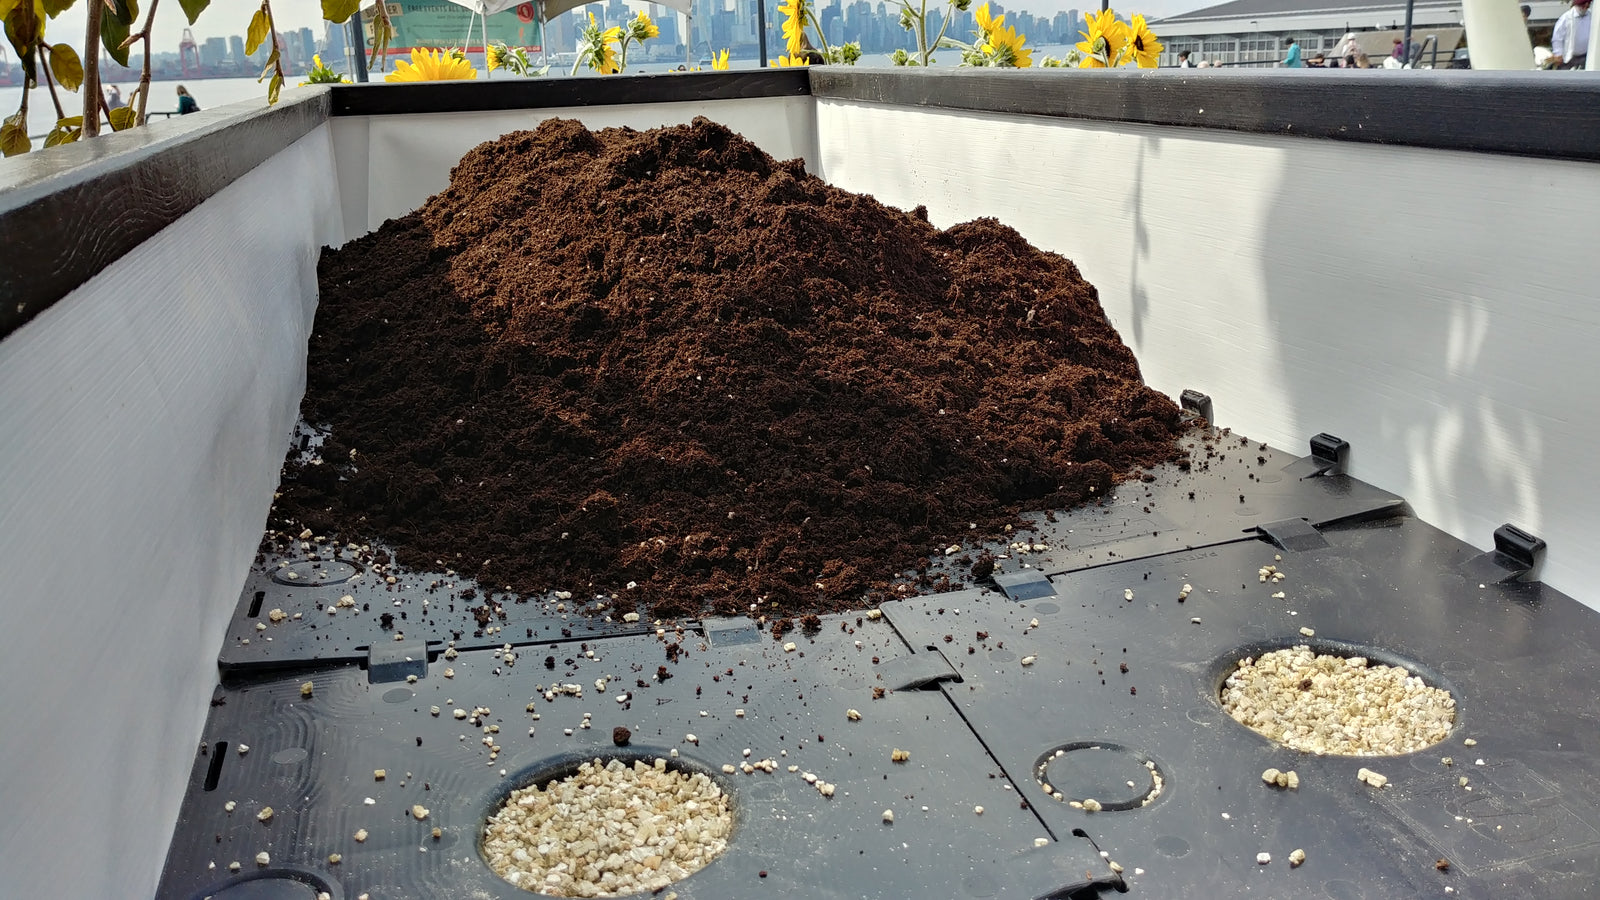
Step 6: Click your SIPs together and install the reservoir.
Key Take Away: Use the logo on the SIPs to help you orient themis the same direction so they clip together properly. Identify the one SIP with the hole cut in it, this is where your WaterStem will go - Locate it to your convenience.

- Install your reservoir.
- Click the SIPs together to form the grid size ideal for your garden
- If the SIPs prove difficult to clip together, turn them upside down an press down firmly.
Step 7: Insert the WaterStem
Key Take Away: If you don't have a SIP with a hole for the WaterStem, remove your SIPs from your garden before cutting the hole. IT IS NOT worth risking a cut into your liner – it will ruin your day.
The WaterStem requires a 2" holesaw.

- WaterStem into the pre-drilled hole in your SIP grid
- It should be nice and snug as you insert the tube all the way to the bottom of the reservoir, and resting lightly on the liner.
Step 8: Fill your Garden with soil and get planted!
Key Take Away: Use the right soil! To create ideal growing conditions, an organic container blend is what you're looking for.
Tips for identifying a good blend are: It will contain either peat moss or coconut coir (maybe both) and have either perlite or vermiculite to help facilitate drainage and soil aeration.